Import Wallet or Private Key
This is a guide to importing your wallet or private key into Turnkey.
Implementation guides
Follow along with the Turnkey CLI, Embedded iframe, NodeJS, and Local Storage guides.
CLI
Install the latest version of Turnkey CLI to access the new import functionality. You can find detailed instructions for installation here.
Steps
- Generate an encryption key:
turnkey generate encryption-key \
--organization $ORGANIZATION_ID \
--user $USER_ID \
--encryption-key-name demo-encryption-key
- The
--userflag (required) is the id of the user importing the private key; this is required because the underlying encryption keys used for import are scoped to each user. - The
--encryption-key-nameflag is to specify a name for the encryption key. Note that an encryption key !== Turnkey API key; an encryption key is used exclusively for secure activities like import and export.
- Initialize import:
turnkey wallets init-import \
--user $USER_ID \
--import-bundle-output "./import_bundle.txt" \
--key-name demo-api-key
- The
--import-bundle-output(required) flag is the desired output file path for the “import bundle” that will be received from Turnkey. The “import bundle” contains the ephemeral public key generated by the Turnkey signer enclave for the specified user. The private key plaintext is encrypted to this public key in Step 2. - Reminder: The
--key-nameflag specifies the name of API key with which to interact with the Turnkey API service. This should be the name of a previously created key. If you do not have one, visit the quickstart guide for help creating one.
- Encrypt without saving plaintext to filesystem. This can be done offline:
turnkey encrypt \
--user $USER_ID \
--import-bundle-input "./import_bundle.txt" \
--plaintext-input /dev/fd/3 3<<<"$MNEMONIC_1" \
--encrypted-bundle-output "./encrypted_bundle.txt" \
--encryption-key-name demo-encryption-key
- The
--import-bundle-inputflag (required) is the desired input file path for the “import bundle”. - The
--plaintext-inputflag is the desired input file path for the private key plaintext. You can pass a filename here or feed the plaintext string directly into the standard input as shown above. - The
--encrypted-bundle-output(required) flag is the desired output file path for the “encrypted bundle” that will be sent to Turnkey in Step 3. The “encrypted bundle” contains the ephemeral public key generated by the CLI as part of the shared secret computation with the Turnkey signer enclave. It also contains the ciphertext, which is the plaintext input encrypted by the Turnkey signer’s ephemeral public key.
- Import private key:
turnkey wallets import \
--user $USER_ID \
--name "demo key"  \
--encrypted-bundle-input "./encrypted_bundle.txt" \
--key-name demo-api-key
- The
--encrypted-bundle-input(required) flag is the desired input file path for the “encrypted bundle” that will be sent to Turnkey. - Options are listed here for the
--curveand--address-formatflags.
Private Key support
Turnkey CLI also supports importing private keys. Follow the same steps as importing a wallet via CLI but use the turnkey private-keys commands instead. In Step 2 (encrypt), pass a --key-format flag for key-specific formatting; the options for private keys are:
hexadecimal: Used for Ethereum. Examples:0x13eff5b3f9c63eab5d53cff5149f01606b69325496e0e98b53afa938d890cd2e, 13eff5b3f9c63eab5d53cff5149f01606b69325496e0e98b53afa938d890cd2esolana: Used for Solana. It’s a base58-encoding of the concatenation of the private key and public key bytes. Example:2P3qgS5A18gGmZJmYHNxYrDYPyfm6S3dJgs8tPW6ki6i2o4yx7K8r5N8CF7JpEtQiW8mx1kSktpgyDG1xuWNzfsM
turnkey encrypt \
--import-bundle-input "./import_bundle.txt" \
--plaintext-input /dev/fd/3 3<<<"$RAW_KEY_1" \
--key-format “hexadecimal” \
--encrypted-bundle-output "./encrypted_bundle.txt"
Embedded iframe
- We have released open-source code to create target encryption keys and encrypt wallet mnemonics for import. We've deployed a static HTML page hosted on
import.turnkey.commeant to be embedded as an iframe element (see the code here). This ensures the mnemonics and keys are encrypted to keys that the user has access to, but that your organization does not (because they live in the iframe, on a separate domain). - We have also built a package to help you insert this iframe and interact with it in the context of import:
@turnkey/iframe-stamper
In the rest of this guide we'll assume you are using these helpers.
Steps
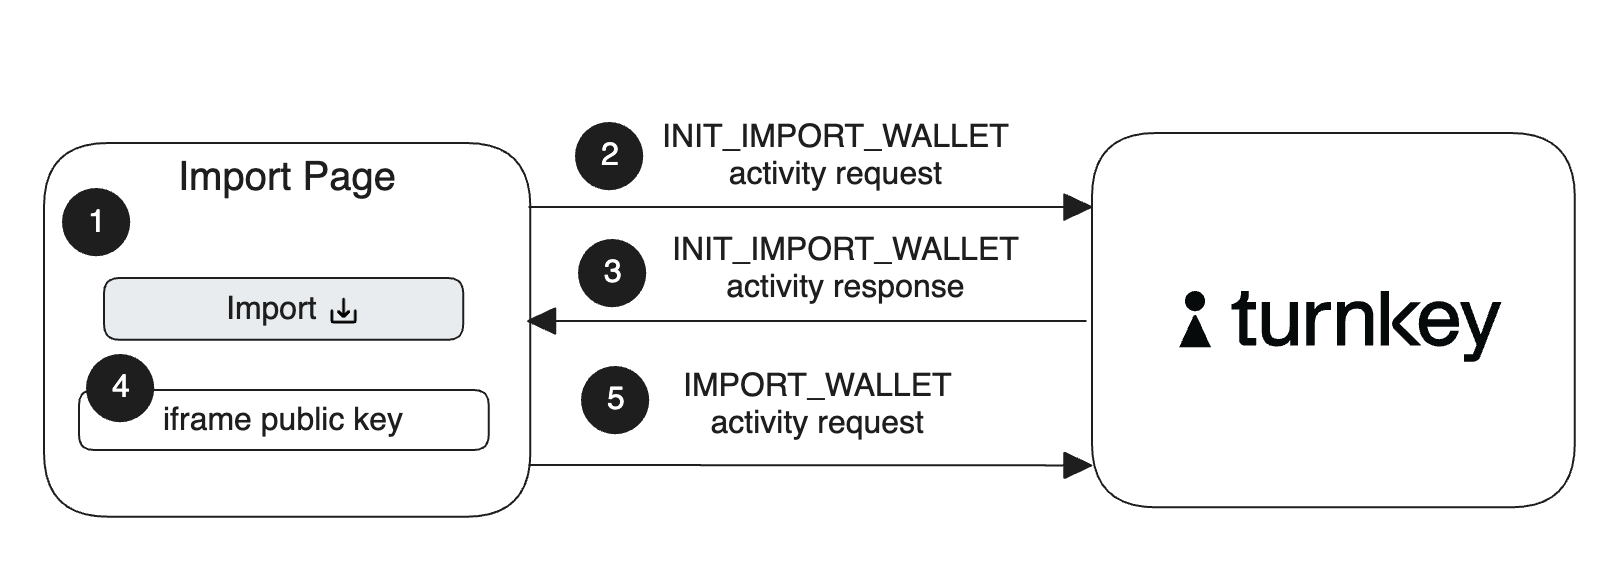
Here's a diagram summarizing the wallet import flow step-by-step (direct link):

Let's review these steps in detail:
When a user on your application clicks "import", display a new import UI. We recommend setting this import UI as a new hosted page of your application that contains the iframe element that the user will enter their mnemonic into and an import button.
While the UI is in a loading state, your application uses
@turnkey/iframe-stamperto insert a new iframe element:const iframeStamper = new IframeStamper({
iframeUrl: "https://import.turnkey.com",
// Configure how the iframe element is inserted on the page
iframeContainer: yourContainer,
iframeElementId: "turnkey-iframe",
});
// Inserts the iframe in the DOM.
await iframeStamper.init();
// Set state to not display iframe
let displayIframe = "none";
return (
// The iframe element does not need to be displayed yet
<div style={{ display: displayIframe }} />
);Your application prompts the user to sign a new
INIT_IMPORT_WALLETactivity with the ID of the user importing the wallet.Your application polls for the activity response, which contains an import bundle.
Need help setting up async polling? Checkout our guide and helper here.
Your application injects the import bundle into the iframe and displays the iframe upon success:
// Inject import bundle into iframe
let success = await iframeStamper.injectImportBundle(importBundle);

if (success !== true) {
  throw new Error("unexpected error while injecting import bundle");
}

// If successfully injected, update the state to display the iframe
iframeDisplay = "block";
When a user clicks on the import button on your web page, your application can extract the encrypted mnemonic bundle from the iframe:
// Extract the encrypted bundle from the iframe
let encryptedBundle =
  await iframeStamper.extractWalletEncryptedBundle(importBundle);
Your applications passes the encrypted bundle as a parameter in a new IMPORT_WALLET activity and prompts the user to sign it.
Import is complete!
In your Turnkey dashboard, the imported user Wallet will be flagged as “Imported”.
NodeJS
A full example Node script can be found here: https://github.com/tkhq/sdk/tree/main/examples/import-in-node
Steps
- Initialize a new Turnkey client:
import { Turnkey } from "@turnkey/sdk-server";
import {
  encryptPrivateKeyToBundle,
  encryptWalletToBundle,
} from "@turnkey/crypto";

...

const turnkeyClient = new Turnkey({
    apiBaseUrl: "https://api.turnkey.com",
    apiPublicKey: process.env.API_PUBLIC_KEY!,
    apiPrivateKey: process.env.API_PRIVATE_KEY!,
    defaultOrganizationId: process.env.ORGANIZATION_ID!,
  });
- Initialize the import process (Turnkey activity):
const initResult = await turnkeyClient.apiClient().initImportWallet({
  userId,
});
- Encrypt wallet to bundle:
const walletBundle = await encryptWalletToBundle({
  mnemonic,
  importBundle: initResult.importBundle,
  userId,
  organizationId,
});
- Import wallet (Turnkey activity):
const walletImportResult = await turnkeyClient.apiClient().importWallet({
  userId: userId,
  walletName: "Your imported wallet!",
  encryptedBundle: walletBundle,
  accounts: [], // these are the wallet accounts you'd like to derive; after all, you've just imported a HD wallet! See https://learnmeabitcoin.com/technical/hd-wallets for more
});
Congrats! You've imported your wallet 🎉
Private Key support
The process for importing a private key instead of wallet is largely similar, but has a key difference in that you must specify the format of your imported private key:
- Initialize a new Turnkey client:
import { Turnkey } from "@turnkey/sdk-server";
import {
  encryptPrivateKeyToBundle,
  encryptWalletToBundle,
} from "@turnkey/crypto";

...

const turnkeyClient = new Turnkey({
    apiBaseUrl: "https://api.turnkey.com",
    apiPublicKey: process.env.API_PUBLIC_KEY!,
    apiPrivateKey: process.env.API_PRIVATE_KEY!,
    defaultOrganizationId: process.env.ORGANIZATION_ID!,
  });
- Initialize the import process (Turnkey activity):
const initResult = await turnkeyClient.apiClient().initImportPrivateKey({
  userId,
});
- Encrypt private key to bundle:
const privateKeyBundle = await encryptPrivateKeyToBundle({
  privateKey,
  keyFormat,
  importBundle: initResult.importBundle,
  userId,
  organizationId,
});
- Import private key (Turnkey activity):
const privateKeyImportResult = await turnkeyClient
  .apiClient()
  .importPrivateKey({
    userId: userId,
    privateKeyName: "Your imported private key!",
    encryptedBundle: privateKeyBundle,
    curve: keyFormat == "SOLANA" ? "CURVE_ED25519" : "CURVE_SECP256K1",
    addressFormats:
      keyFormat == "SOLANA"
        ? ["ADDRESS_FORMAT_SOLANA"]
        : ["ADDRESS_FORMAT_ETHEREUM"],
  });
Congrats! You've imported your private key 🎉
Local Storage
If you do not have access to an iframe (e.g. in a mobile context) or would prefer not to use an iframe, you can opt to use other environment-agnostic methods to perform import using Turnkey libraries. So while this section is called Local Storage (for consistency with the Export guide), nothing is stored in Local Storage; instead, the relevant encrypt{Wallet, PrivateKey}ToBundle method uses an ephemeral key.
Steps
- Initialize Turnkey client:
import { Turnkey } from "@turnkey/sdk-browser";
import { generateP256KeyPair, encryptWalletToBundle } from "@turnkey/crypto";

...

const turnkey = new Turnkey({
  apiBaseUrl: "https://api.turnkey.com",
  defaultOrganizationId: process.env.TURNKEY_ORGANIZATION_ID,
});
const passkeyClient = turnkey.passkeyClient();
- Initialize the import process (Turnkey activity):
const initResult = await passkeyClient.initImportWallet({
  userId, // your user ID
});
- Encrypt wallet to bundle:
const walletBundle = await encryptWalletToBundle({
  mnemonic,
  importBundle: initResult.importBundle,
  userId, // your user ID
  organizationId, // your organization ID
});
- Import wallet (Turnkey activity):
const walletImportResult = await passkeyClient.importWallet({
  userId, // your user ID
  walletName: "Your imported wallet!", // your desired name for the resulting imported wallet
  encryptedBundle: walletBundle,
  accounts: [], // these are the wallet accounts you'd like to derive; after all, you've just imported a HD wallet! See https://learnmeabitcoin.com/technical/hd-wallets for more
});
Congrats! You've imported your wallet 🎉
The process for importing a private key instead of wallet is largely similar, but has a key difference in that you must specify the format of your imported private key:
Private Key support
- Initialize Turnkey client:
import { Turnkey } from "@turnkey/sdk-browser";
import { generateP256KeyPair, encryptPrivateKeyToBundle } from "@turnkey/crypto";

...

const turnkey = new Turnkey({
  apiBaseUrl: "https://api.turnkey.com",
  defaultOrganizationId: process.env.TURNKEY_ORGANIZATION_ID,
});
const passkeyClient = turnkey.passkeyClient();
- Initialize the import process (Turnkey activity):
const initResult = await passkeyClient.initImportPrivateKey({
  userId, // your user ID
});
- Encrypt private key to bundle:
const privateKeyBundle = await encryptPrivateKeyToBundle({
  privateKey, // your private key string
  keyFormat, // your desired key format. See the Private Key notes section for more
  importBundle: initResult.importBundle,
  userId, // your user ID
  organizationId, // your organization ID
});
- Import private key (Turnkey activity):
const privateKeyImportResult = await passkeyClient.importPrivateKey({
  userId,
  privateKeyName: "Your imported private key!", // your desired name for the resulting imported private key
  encryptedBundle: privateKeyBundle,
  curve: keyFormat == "SOLANA" ? "CURVE_ED25519" : "CURVE_SECP256K1",
  addressFormats:
    keyFormat == "SOLANA"
      ? ["ADDRESS_FORMAT_SOLANA"]
      : ["ADDRESS_FORMAT_ETHEREUM"],
});
Congrats! You've imported your private key 🎉
Private Key notes
Turnkey also supports importing Private Keys. Follow the same steps above for importing Wallets as mnemonics, but instead use the INIT_IMPORT_PRIVATE_KEY and IMPORT_PRIVATE_KEY activities and the extractKeyEncryptedBundle method from the @turnkey/iframe-stamper. You can pass an optional keyFormat to extractKeyEncryptedBundle(keyFormat) that will apply either Hexadecimal or Solana formatting to the private key that is entered in the iframe. The default key format is hexadecimal, which is used by MetaMask, MyEtherWallet, Phantom, Ledger, and Trezor for Ethereum keys. For Solana keys, you will need to pass the solana key format.
Cryptographic details
Turnkey's import functionality ensures that neither your application nor Turnkey can view the wallet mnemonic or private key.
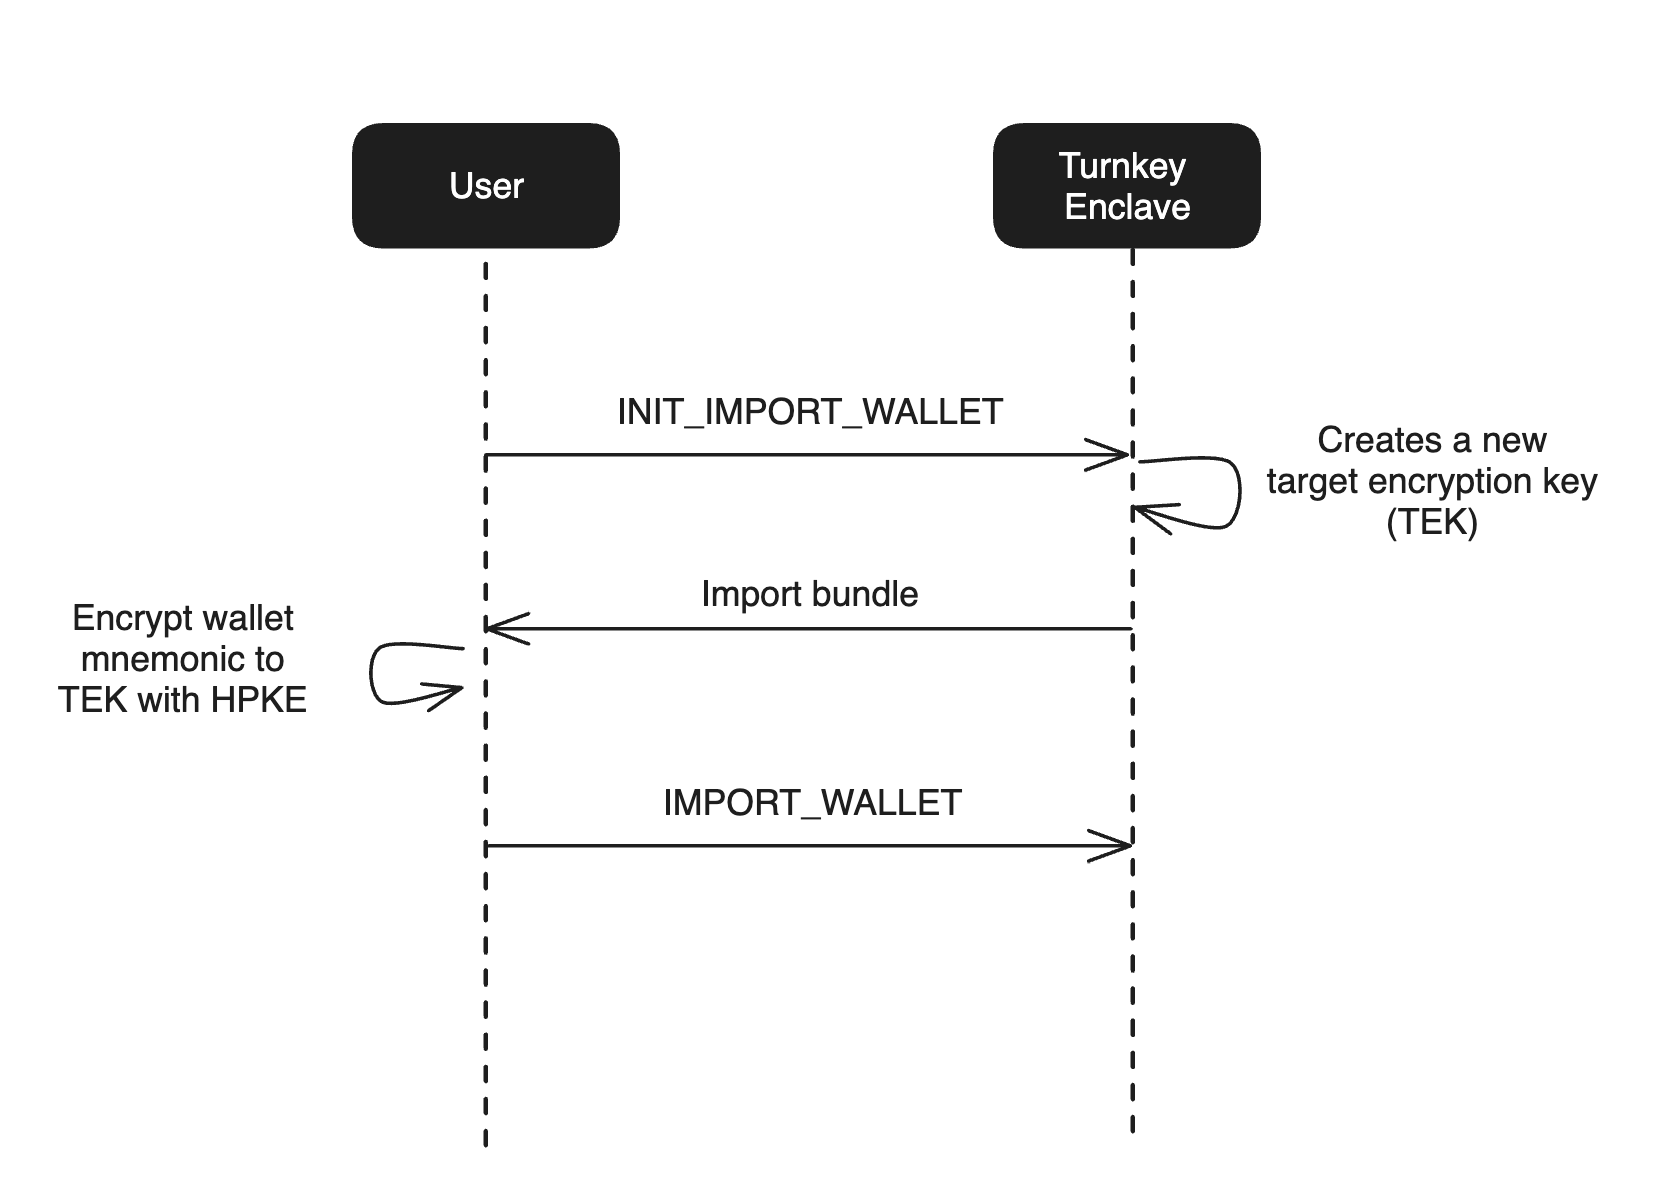
It works by anchoring import in a target encryption key (TEK). This target encryption key is a standard P-256 key pair and is generated in the Turnkey secure enclave via a INIT_IMPORT_WALLET or INIT_IMPORT_PRIVATE_KEY activity. This TEK is encrypted to the enclave's quorum key and the TEK public key is returned in the activity response.
The following diagram summarizes the flow:

The iframe encrypts the wallet's mnemonic or private key to the secure enclave's TEK using the Hybrid Public Key Encryption standard, also known as HPKE or RFC 9180. The encrypted key material is then passed as a parameter inside of a signed IMPORT_WALLET or IMPORT_PRIVATE_KEY activity. During this activity, the Turnkey enclave decrypts the TEK and uses it to decrypt the encrypted key material to create a new wallet or private key.
UI customization
Everything is customizable in the import iframe except the sentence of mnemonic words, which is minimally styled: the text is left-aligned and the padding and margins are zero. Here's an example of how you can configure the styling of the iframe.
const iframeCss = `
  iframe {
      box-sizing: border-box;
      width: 400px;
      height: 120px;
      border-radius: 8px;
      border-width: 1px;
      border-style: solid;
      border-color: rgba(216, 219, 227, 1);
      padding: 20px;
  }
`;

return (
  <div style={{ display: iframeDisplay }} id="your-container">
    <style>{iframeCss}</style>
  </div>
);